From the moment the FlightScope Mevo+ 2023 edition arrived at my front door, the first thing I wanted to do was take it straight to the driving range and put it to the test. But, before I could start hitting balls, I had to set up the device.
While this may sound like a bit of a hassle, the incredible technology that comes with the Mevo+ makes the experience a breeze.
Here’s a step-by-step guide to set up your Mevo+:
Log in to the FS Golf app
Before you can do anything with your Mevo+, you will need to download the FS Golf App, which is available for free on iOS and Android. Within the app, you will need to either create an account through the FlightScope Cloud or login with your existing account details.
Ensure the FS Golf app is set up for Mevo+
After logging in, you will need to ensure the FS Golf app is set up for Mevo+.
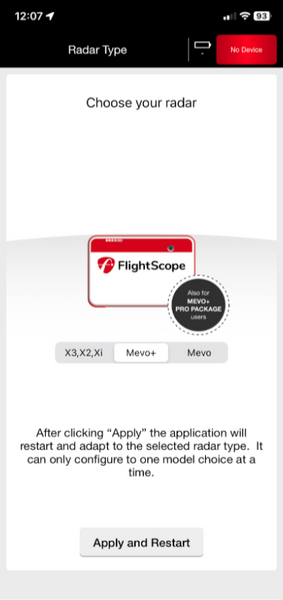
First time users of the app will immediately be taken to a screen with a selection of the FlightScope radars that can be paired with FS Golf. Once you have selected Mevo+, the app will restart and you will now be able to connect to your device.
As I was making the switch from Mevo to Mevo+, I already had the FS Golf app downloaded and set up for Mevo. In order to change this, I clicked on the ‘Settings’ tab at the top of the home page, then selected ‘Radar Settings’ and ‘Radar Type’. From here, I just selected Mevo+.
Switch on and connect to your device
After you have logged into FS Golf and selected Mevo+ as your radar, you can switch on your device. This is done by holding down the power button at the top of the device until the lights begin flashing. The device will also make beeping sounds until it is fully switched on.
See the video below for an example:
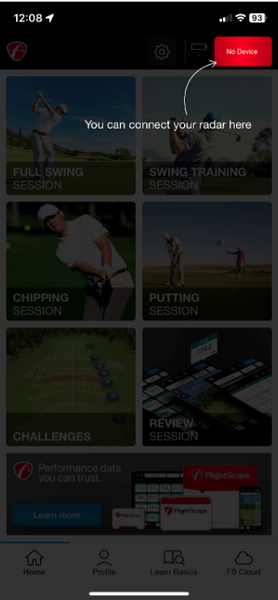
Once your device has been switched on, you can connect to it on FS Golf. You do this by selecting the top right hand corner of the home page (at first it will say ‘No Device’).
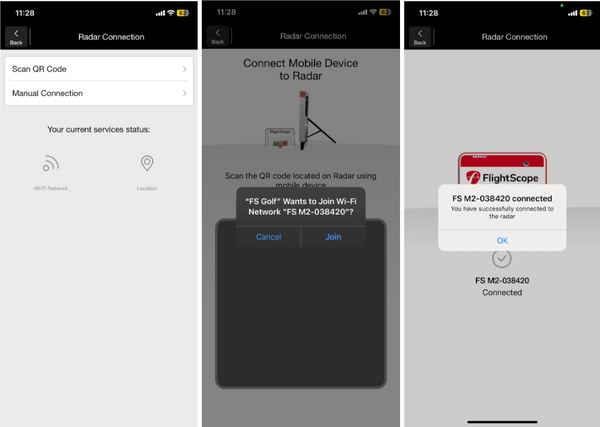
From here, you can either connect to your Mevo+ manually or by scanning the QR code on the back of the device.
I prefer scanning the QR code, as within seconds of the app opening the camera – you will receive an option to connect to your Mevo+, which is identified by the serial number on the back of your device.
Go to Radar Settings – Radar Setup
Once you have connected to your Mevo+, head to ‘Radar Settings’ under the Settings tab, and click on ‘Radar Setup’. Here you will be able to adjust the distance to the ball, the tee height and the target alignment.
For both an indoor and an outdoor session the device should be set up 8 feet behind the ball. I mainly practice outdoors, and I have found that two large strides behind the ball work perfectly for me (I’m 5’9), but I would recommend a tape measure if you want to be spot on. Correct setup matters for accurate data.
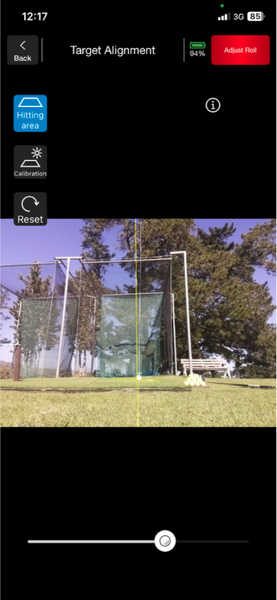
While alignment could be a bit of a guessing game when setting up a session with Mevo, the target alignment on the Mevo+ is particularly simple.
When you select ‘Target Alignment’, the app will open up the camera on your Mevo+, as well as a graphic including a target line, golf ball and hitting area. All you have to do to get the perfect setup is make sure the graphic of the golf ball, target line and hitting area are lined up perfectly with your actual hitting area.
Adjust Tilt and Roll if necessary
The Mevo+ includes setup aspects called ‘Tilt’ and ‘Roll’ for maximum tracking precision. It is worth mentioning that your device will only ask you to adjust these if they are out of the set limits.
Thanks to the intuitiveness of the Mevo+, adjusting both of these aspects is very simple.
Essentially, the ‘Roll’ is dependent on how flat the setup surface is, as the Mevo+ works best on a flat surface. So, if you set up your Mevo+ on a side slope – then you will have to adjust the roll until it is flat, or on an acceptable level (For example, you could place a towel under one side of the device to even it out). The device provides real-time updates, so you will be able to tweak the ‘Roll’ until the numbers turn green.
Take the video below as an example, where I set my Mevo+ up on a severe side slope and adjusted its position until it was correct:
The Mevo+ 2023 edition automatically sets the ‘Tilt’ to the required 12 degrees. So, all you have to do is open the kickstand on the back of your Mevo+ until it is all the way back, then you’re ready to go.
Once your Mevo+ is set up, you’re all set to enjoy the countless benefits that come with this incredible device.